
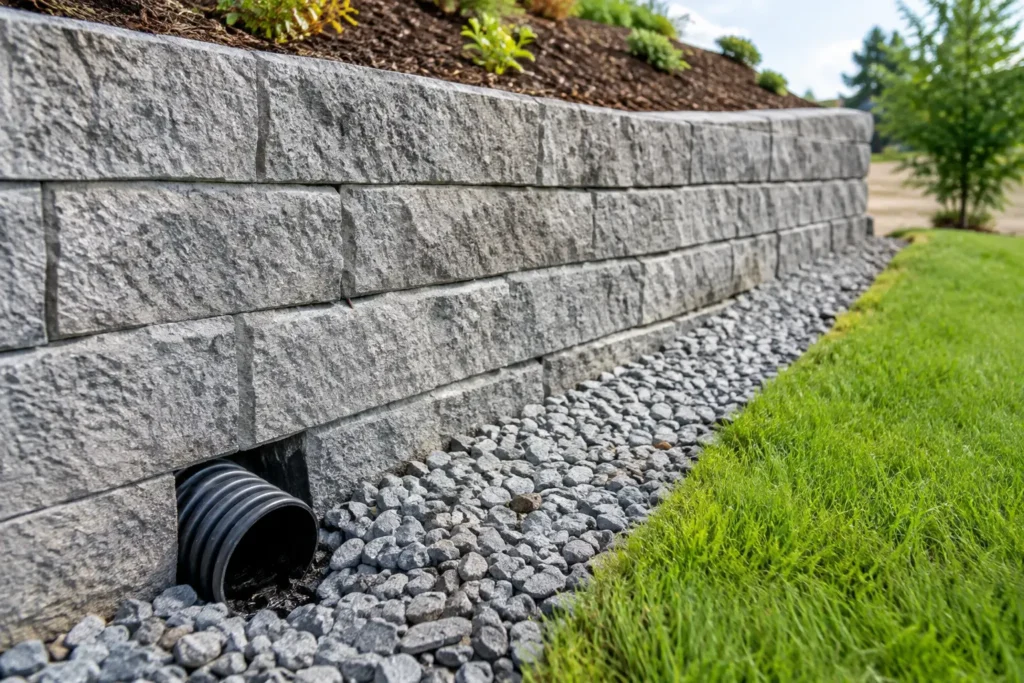
A retaining wall can look flawless on handover day and still fail years earlier than it should if water has nowhere to go. The best retaining wall drainage methods manage groundwater behind the wall, direct surface runoff away from it, and discharge collected water to a suitable location. This matters across Melbourne properties, where clay-heavy soils, sloping blocks and heavy downpours can quickly build pressure behind a wall.
Drainage is not an optional add-on. It is a core part of the wall’s structure, whether you are building a low garden edge, a timber retaining wall or an engineered block or concrete system supporting a driveway, patio or raised yard.
Why drainage makes or breaks a retaining wall
Soil is heavy on its own. When it becomes saturated, it places far more force against the back of a retaining wall. This is known as hydrostatic pressure. Over time, that pressure can cause a wall to lean, bow, crack, separate at joints or move at its footing.
Poor drainage also carries fine soil particles through gaps in the wall or into the drain line. That can stain the face, wash out material behind the wall and eventually block the drainage system that was meant to protect it. In clay soils, water can sit behind a wall long after rain has stopped, making proper drainage especially valuable.
The right solution depends on wall height, soil type, site slope, wall material and where water can legally and safely discharge. A small landscape wall may need a straightforward gravel zone and drain line. A taller wall, or one near a building, boundary or hard surface, needs a properly considered design and may require engineering approval.
The best retaining wall drainage methods
The strongest results usually come from combining several drainage measures rather than relying on one feature alone.
Install an agricultural drain at the base
An agricultural pipe, commonly called ag pipe, is the primary drainage component behind most retaining walls. It is a perforated pipe placed at the lowest practical point behind the wall, generally beside the footing on a compacted base. Water filtering through the gravel reaches the pipe and is carried away before it can build up pressure.
For most residential applications, the pipe should run continuously along the wall and fall towards a lawful outlet. A drain that is flat, crushed, disconnected or terminated with no discharge point will not do its job. The outlet may connect to an approved stormwater point where permitted, daylight to a suitable lower area of the property, or discharge through another compliant site-specific solution.
Never send wall drainage towards a neighbour’s property, under a driveway without suitable planning, or against a building. Drainage should be designed with the whole site in mind, not treated as an afterthought once excavation has begun.
Create a clean drainage gravel zone
A layer of free-draining crushed rock behind the wall gives water an easier path down to the ag pipe. It also reduces the amount of wet soil pressing directly against the wall. As a general rule, a drainage zone should extend from the base drain up the rear of the wall, rather than stopping halfway up.
The width varies with the wall design and available space, but a narrow strip of gravel is rarely enough for a wall holding back substantial ground. Clean, angular drainage aggregate works better than soil, sand or mixed rubble because water can pass through its voids. Recycled material may be suitable in some applications, provided it is clean, graded appropriately and does not include fines that will clog the system.
Use geotextile fabric to keep fines out
Geotextile fabric separates the drainage gravel from the surrounding soil. It lets water pass through while helping to prevent fine particles from migrating into the aggregate and ag pipe.
This detail is easily overlooked, particularly on tight-access projects or smaller garden walls. Yet it can significantly extend the working life of the drainage system. The fabric should wrap or line the gravel zone without being stretched, torn or left with large open gaps. It is not a replacement for gravel or pipe – it supports both by keeping the drainage path clearer.
Include weep holes where the wall type suits them
Weep holes are openings through the face of a retaining wall that allow trapped water to escape. They are particularly useful in concrete masonry, rendered block and some concrete retaining wall systems. When installed correctly, they provide a visible outlet for water and relieve pressure near the face of the wall.
They are not required for every wall type. Timber sleeper walls and many segmental block systems have joints or construction details that drain differently. Weep holes also need the gravel and fabric system behind them; otherwise, they can leak soil, clog or leave unsightly stains on the wall face.
For walls visible from entertaining areas or front gardens, placement should balance drainage performance with appearance. A skilled installer can plan holes at consistent levels and ensure runoff does not create muddy patches at the base of the wall.
Stop surface water before it reaches the wall
Subsurface drainage alone cannot compensate for poor surface grading. Roof water, paved-area runoff and water flowing down a slope should be directed away from the top of the wall wherever possible.
This may involve shaping garden beds to fall away from the wall, installing spoon drains or strip drains beside paving, capturing roof water in stormwater infrastructure, or using a swale to guide runoff through the landscape. On sloping blocks, an interceptor drain above the retained area can be highly effective. It catches water moving downhill before it enters the backfill zone.
Avoid creating a garden bed that acts like a bathtub behind a retaining wall. Deep mulch, dense clay fill and edging that blocks the escape route can all hold water where it does the most damage.
Match the drainage design to the wall and site
There is no single specification that suits every retaining wall. A low timber sleeper border in a free-draining backyard may perform well with gravel, geotextile and a correctly graded ag pipe. A high wall retaining a substantial slope may need engineered footings, reinforced construction, drainage outlets and carefully specified backfill.
Material also changes the approach. Concrete sleeper walls are durable and suited to many Melbourne sites, but they still rely on drainage behind the sleepers. Segmental block walls often include purpose-made drainage aggregate and geogrid reinforcement on taller installations. Timber walls require particular attention to drainage because prolonged moisture can shorten the lifespan of posts and sleepers.
Access, existing services, neighbouring levels and nearby structures all matter. Before excavation, check for plumbing, electrical and communications services. If a wall is close to a house, pool, driveway or boundary, the consequences of water movement are greater and professional planning becomes even more important.
Common drainage mistakes to avoid
Many drainage failures start with decisions that seem minor during construction. The most common are using excavated clay as backfill, laying ag pipe without enough fall, wrapping the pipe in fabric but omitting drainage gravel, and failing to provide a real outlet.
Another mistake is connecting downpipes directly into the wall’s drainage zone. Roof runoff can overwhelm the system during a storm. Keep roof-water management and retaining wall drainage coordinated, but do not assume one undersized pipe can handle both jobs.
It is also risky to cover the top of the drainage zone with impermeable paving or concrete without planning where surface water will go. Hardscaping can improve a yard’s usability, but it changes how water moves across the site. The drainage plan needs to be considered before paving, decking and planting are completed.
When professional installation is the smarter option
A retaining wall is carrying soil, water and often part of the usable area of your property. If it is tall, supports a slope, sits near a structure, shows signs of movement, or needs to manage significant runoff, professional advice is worth seeking before work begins.
An experienced landscape team can assess levels, soil conditions, wall materials, drainage paths and the finish you want around the wall. This avoids the costly situation where a newly completed garden, turf area or paved surface has to be removed to repair a failed drain line later.
At Australian Landscape Hub, retaining wall drainage is planned as part of the complete landscape build, so the wall, surrounding ground levels, paving and garden areas work together. A well-drained wall is rarely the most noticeable feature in a finished yard – and that is exactly the point. It should quietly protect the space you have invested in through every season.